
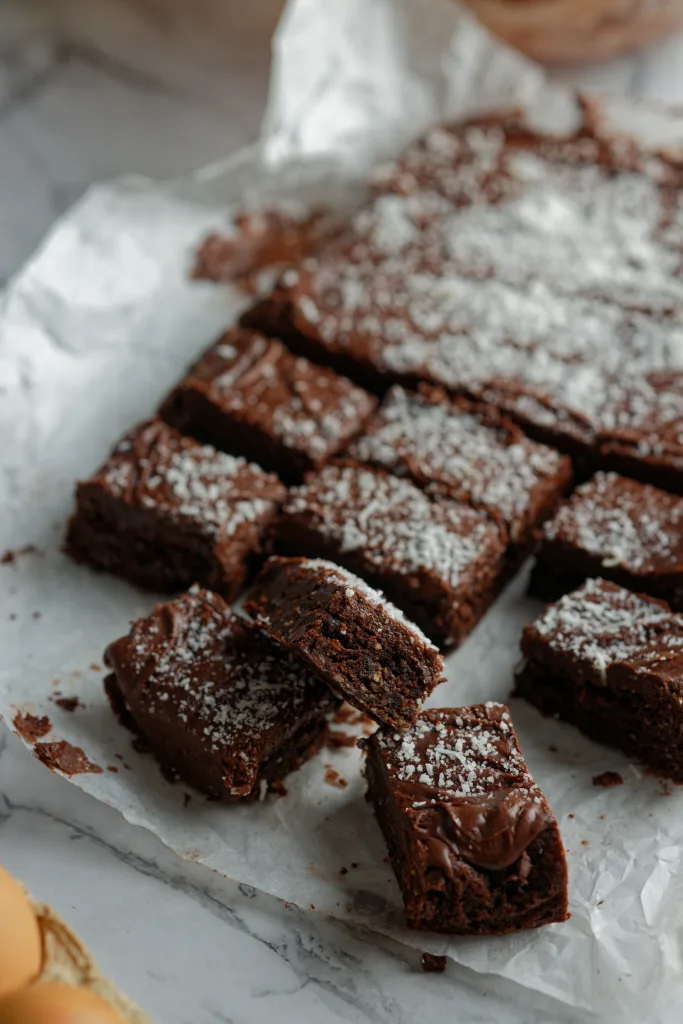
Chocolate Coconut Slice, a popular snack Down Under. Consisting of a rich chocolatey, almost brownie-like slice that is topped with a fudgy chocolate frosting. An excellent One-Bowl recipe for morning/afternoon tea, bake-sales, family gatherings, and more.

Why This Recipe Is Amazing
- Flavour Harmony: The recipe strikes a perfect balance between rich chocolate and the tropical sweetness of coconut.
- Texture Variety: A fudgy and brownie-like base topped with a thick fudgy icing – what’s not to love?
- Easy Prep: The recipe uses ONE BOWL! Gasp! It’s straightforward and doesn’t require any complicated techniques. This makes it accessible for both novice and experienced bakers.
- Eat it anytime, anywhere: The chocolate coconut slice is versatile and can be enjoyed as a snack, dessert, or a sweet treat with a cup of coffee or tea.
- Family-Friendly Appeal: The classic chocolate and coconut pairing often appeals to most, making it a family-friendly dessert that can be enjoyed by both children and adults.
- Nostalgic Comfort: Try a classic Aussie recipe that we grew up on. A familiar combination of chocolate and coconut creates nostalgic feelings.

What ingredients are needed for Chocolate Coconut Slice
- Salted Butter: Provides moisture, flavour, and richness to the base. The salt enhances the overall taste and means you don’t need to add salt to the recipe. Substitute for unsalted and then add 1 tsp salt.
- Light Brown Sugar: Role: Sweetens the base, adds moisture, and contributes to the yummy chewy texture. The brown sugar also provides a subtle caramel flavour that works nicely with the rich chocolate in this recipe.
- Large Egg: Acts as a binding agent, providing structure and moisture to the base.
- Vanilla Extract: Enhances the overall flavour of the base with a sweet and aromatic vanilla note.
- Plain Flour: Provides structure to the slice. The gluten in the flour helps give the base its texture.
- Baking Powder: Acts as a leavening agent, helping the slice rise slightly and become light and fluffy.
- Cocoa Powder: Adds chocolateyness and colour to the base, making it rich and decadent. You can use reg cocoa powder or try a ‘Dutch process’ cocoa for a deeper colour and richer flavour.
- Shredded or Desiccated Coconut: Adds a slightly chewier texture and a distinct coconut flavour to the base, complementing the chocolate.
- Icing Ingredients:
- Icing Sugar: Sweetens and thickens the icing, creating a smooth and sweet topping.
- Cocoa Powder: Adds chocolate flavour and colour to the icing, maintaining a consistent chocolate theme.
- Butter: Enhances the richness and creaminess of the icing, ensuring a velvety texture.
- Warm Milk: Thins the icing to a spreadable consistency, making it easier to coat the base evenly.

Setting You Up For Success – Tips & Tricks
- Room Temperature Ingredients:
- Bring eggs and butter to room temperature before using. This promotes even mixing and better texture.
- Sifting Dry Ingredients:
- Sift cocoa powder and flour to remove lumps and ensure a smooth batter.
- Evenly Spread the Batter:
- Ensure the base is evenly spread in the pan for consistent baking.
- Monitor Baking Time:
- Keep a close eye on the baking time to prevent overcooking or undercooking. Use a toothpick test or gently press the surface for doneness.
- Cool a little Before Icing:
- Allow the base to cool for around 10 minutes before spreading the icing. It helps it melt slightly and spread evenly. Alternatively, you can spread it when the base is cooled, giving the icing a nice swirly texture on top.
- Precision in Measurements:
- Use accurate measurements, use a scale to weigh your ingredients. It will help achieve the desired taste and texture every time.
- Experiment with Toppings:
- Feel free to customize the topping. You can add chopped nuts or drizzle melted chocolate for variety.
- Layering and Storage:
- If stacking the slices, place baking paper between layers to prevent sticking.

Frequently Asked Questions
When I made this dish on our live cooking show, some community members asked:
Yes, you can use unsalted butter. If you do, consider adding 1/2 tsp salt to the base to maintain a balanced flavour.
Yes, but be mindful of the sweetness level. Adjust the quantity of sugar in the base or icing accordingly. I would prefer you use unsweetened if possible.
Store the slices in an airtight container at room temperature or in the fridge (chewier texture!) for up to a week. For longer storage freeze in layers separated by baking paper.
Yes, you can try but I haven’t tested it using a gluten-free flour blend in place of regular flour. Ensure other ingredients, like baking powder, are also gluten-free.
Sift the icing sugar and cocoa thoroughly to avoid lumps and add milk slowly. Ensure the butter is at room temperature and mix well. If needed, you can use a hand mixer or blender for a smoother consistency.
Troubleshooting For Chocolate Coconut Slice
- Dry Base:
- Solution: Ensure accurate measuring of dry ingredients, and don’t overmix the batter. You can also try reducing the baking time slightly to prevent overcooking.
- Undercooked Base:
- Solution: Check the accuracy of your oven temperature. Extend the baking time if necessary, and make sure to insert a toothpick into the centre to check for moist crumbs rather than wet batter.
- Icing Too Runny:
- Solution: Add more icing sugar gradually until the desired thickness is achieved. Ensure that the warm milk is added slowly (you don’t need to add it all) and that the mixture is stirred well.
- Icing Too Thick:
- Solution: Add a small amount of warm milk gradually until the desired consistency is reached. Be cautious not to add too much liquid at once.
- Inconsistent Texture:
- Solution: Ensure thorough mixing of ingredients, especially when combining wet and dry components. Make sure the batter is evenly spread in the pan before baking.
- Sticking to the Pan:
- Solution: Grease and line the pan thoroughly with baking paper. Allow the slice to cool completely before attempting to lift it out of the pan.
Looking For More Yumminess?
Whether you are after more simple snacks, easy dinner ideas or delightful desserts, we have you covered!
Did you make this recipe?
Let us know how it turned out for you! Comment below, tag @missmolly_makes on Instagram using #missmollymakes or visit us LIVE at twitch.tv/missmollymakes
Aussie Chocolate Coconut Slice
Equipment
- 1 large bowl
- hand mixer or spatular
- fine mesh strainer / sifter
- lamington pan (20x30cm / 12×8 inch)
Ingredients
For the Base:
- 187 g (¾ cup) lightly salted butter melted
- 220 g (1 cup) brown sugar firmly packed
- 1 large egg
- 1 tbsp vanilla extract
- 130 g (¾ cup) plain flour
- ¼ tsp baking powder
- 38 g (5 tbsp) cocoa powder
- 60 g (⅔ cup) shredded or desiccated coconut
For the Icing:
- 200 g (1½ cups) powdered icing sugar
- 30 g (¼ cup) cocoa powder
- 25 g (1½ tbsp) lightly salted butter softened
- 2-3 tbsp warm milk
Extras:
- 3+ tbsp desiccated coconut for sprinkling
Instructions
- Preheat your oven to 180°C (350°F). Grease and line a lamington pan (20x30cm / 12×8 inch).
- In a large bowl, combine melted butter, brown sugar, egg, and vanilla. Stir until well combined.
- Sift in the plain flour, baking powder and cocoa, then add the shredded or desiccated coconut. Mix until the batter is well combined.
- Spread the mixture evenly into the prepared pan. Bake in the preheated oven for 25-30 minutes or until the slice is just firm. A toothpick inserted should come out with moist crumbs or should spring back very slightly when pressed with a finger.
- While the base is baking, clean the large bowl and sift in the icing sugar and cocoa. Add the butter and a little warm milk, then stir until the icing is smooth and well combined. Add more milk or icing sugar until you get a nice smooth paste.
- Once the base is done baking, Allow it to cool for 10 minutes then spread the icing over the warm base. This will help create a smooth even layer.
- Sprinkle the remaining desiccated coconut over the warm icing, allowing it to stick. Allow the chocolate coconut slice to cool completely in the pan or place in the fridge for 20minutes. The icing will set as it cools.
- Once cooled, lift the slice out using the baking paper and cut it into squares or bars. Enjoy!
Nutrition
Nutritional information is only an estimate. The accuracy of the nutritional information for any recipe on this site is not guaranteed.
Recipe Published: January 31, 2024 Last Updated: April 2, 2024
Hiya, I’m Lauren but you can call me Molly!
Former OR Nurse and self-taught home cook passionate about Approachable, No-Nonsense recipes to help you level up in the kitchen. Together with my husband Troy, we create simplified dishes for busy people with easy-to-find ingredients!
To learn more about us, our cooking show and more, click here!
 |  |  |  |
— Recent Recipes —
- Banana Coconut & Pineapple (Hummingbird) Cupcakes with Cream Cheese Frosting

- Crispy Pork & Mushroom Dumplings

- Hunter’s Hearty Beef Pie

- Seared Beef Sushi / Aburi

Our Latest ebook
It’s full of Aussie summer recipes, not just from Christmas!